Quantcast
Channel: rtqobd2 - web
Viewing all 43 articles
Browse latest View live

Renault CAN CLIP programming : Yellow PCB vs Green PCB

$
0
0

There are five Chinese versions of Renault CAN CLIP 169 diagnostic tool, which best? The yellow PCB version or the green version?


Renault CAN CLIP china clone: what confirmed:

OBDII diagnostics: Confirmed

Reprogramming: Confirmed

!!!!!!!Renault CAN CLIP programming can be done only with YELLOW PCB version (SP19-E). GREEN versions failed!


Renault CAN CLIP diagnostic interface with item no. SP19-E (1)


Renault CAN CLIP diagnostic interface with item no. SP19-E (2)


Renault CAN CLIP diagnostic interface with item no. SP19-E (3)


Renault CAN CLIP diagnostic interface with item no. SP19-E (4)


Best-quality: Renault CAN CLIP diagnostic tool with item no. SP19-A

Best-quality: Renault CAN CLIP diagnostic tool with item no. SP19-A


Hottest: Renault CLIP diagnostic interface with item no. SP19-B

Hottest: Renault CLIP diagnostic interface with item no. SP19-B


Hottest: Renault CLIP diagnostic interface with item no. SP19-B


Cheapest: Renault CAN CLIP diagnostic interface with item no. SP19-D

 Renault CAN CLIP diagnostic interface with item no. SP19-D


High-quality: Renault CAN CLIP diagnostic interface with item no. SP19-C

High-quality: Renault CAN CLIP diagnostic interface with item no. SP19-C


High-quality: Renault CAN CLIP diagnostic interface with item no. SP19-C


Read the following tips if you decide to buy items from China.

Tip 1: Quality & Price

In China, you can get anything – at/for any price, problem is that you will have to accept the quality. “You get what you pay for” – And this is more or less true, there will be always someone somewhere “trying to” do it for less, but there are thresholds and once you step under them, you will have to suffer from the results. Quality of a product also depends on the material you purchase (You can’t simply make gold out of wood)

Tip 2: Reasons for low costs

The only reason why the obdii diagnostic cables are made in China is because 90% of the materials (micro-controllers and ICs) come from there. That is, it’s mainly about cost, most people would not be ready to pay 3-4 times the price just for the device being made in Europe or the US.

So, items are produced in high quantity and cost saving here


Source:http://blog.obdexpress.co.uk/2017/07/25/renault-can-clip-169-yellow-pcb-vs-green-pcb/


OPCOM Op-com Firmware 1.60 1.59 1.45 1.39 Update User Manual

$
0
0

Here’s the OPCOM firmware update user manual. The op-com software version use one or other firmware version as fw 1.33, fw 1.39, fw 1.41, fw 1.43, fw 1.44 fw 1.45, fw 1.47 fw 1.59 fw 1.60 ( the last one ).


OPCOM firmware introduction:

OP-COM China clone ( op-com 100219a ) from 2009 use fw 1.39 – do not use other firmware


OP-COM software from 2011 use fw1.44


OP-COM software from 2012 used fw 1.45 and the software released at the end of that year used fw1.47


OP-COm software from 2014 used fw1.59 (fw 1.45 & 1.59 come with the same pcb)


VAUX-COm version, Romanian and German version of OP-COM used fw1.60


So the difference it is not in the firmware as 1.44, 1.45, the difference it is in the software version


NOTE:

– With other words if you have an op-com tool that it has firmware 1.39 and you’ll try to use it

– with for instance OP-COM 131223c English version the software will upgrade the firmware of your interface to the version that its need- to 1.59

– If then you try one of the version in Romanian/ German or vaux-com version 131223 the software will upgrade the firmware of the tool to the fw 1.60


So now in conclusion. You do not need to change the firmware of your tool with one or other. You only need to use the necessary firmware for the software version that you are using it.

OPCOM firmware update:

changing (upgrade or downgrade) firmware version in op-com chinese clone is at risk – you’ll damage the tool and it will not work anymore


The only way to change Opcom firmware is


to replace the MCU with a original Microchip PIC18F458

remove 2 component from PCB

Remake a connection on bord and cut another one

Then reprogram the new brand chip PIC18F458 and you can have a brand new clone that will be available to upgrade the firmware of the interface

NOTE:

– The firmware must be the one that it is required by the software version

– Do not use other one because will not 100% correct

– A normal clone not model cannot works with the Model software that works with as we named HQ clone

– This not depend on the ept or firmware and depend on the FTDI ID and PIC dump. All it is about a marriaged dump of PIC MCU with the FTDI ID – a uniq combination

– firmware 1.59 and 1.60 update is most populous:


Good luck


VVDI Prog and Xprog, which is better?

$
0
0

Xhorse VVDI Prog and Xprog, which is better?


Type

VVDI Prog

Xprog

MC9S12DP crack

Yes

Yes

MC9S12XD crack

Yes

Yes

MC9S12XE crack

Yes

Yes

MC65HC(9)08 crack

Yes

No

CDC32XX crack

Will be available

Yes

M35080V3 erase encrypted sites

Yes

Yes

M35080V6 erase encrypted sites

Yes

Yes

080D0 erase encrypted sites

Yes

No

160D0 erase encrypted sites

Yes

No

24Cxx read/write

Yes

Yes

24Exx read/write

Yes

Yes

25Cxx read/write

Yes

Yes

25xxx read/write

Yes

Yes

95xxx read/write

Yes

Yes

95Pxx read/write

Yes

Yes

93Cx6 read/write

Yes

Yes

TC8910x read/write

Yes

Yes

MC965HC05 read/write

Will be available

Yes

MC9S12H read/write

Yes

Yes

MC9S12P read/write

Yes

Yes

MC9S12XH read/write

Yes

Yes

MC9S12XS read/write

Yes

Yes

ATMEGA read/write

Yes

Yes

XC236x read/write

Yes

Yes

MAC724x read/write

Will be available

Yes

AT89x5x read/write

Will be available

No

ATtiny read/write

Will be available

No

PIC read/write

Yes

No

RSF212xx read/write

Yes

No

M308xx read/write

Yes

No

uPD70F3xxx read/write

Yes

No

ST6xxx read/write

Will be available

No

ST10Fxxx read/write

Yes

No

STM8 read/write

Yes

No

STM32 read/write

Will be available

No

MSP430 read/write

Will be available

No

TMS37xxx read/write

Will be available

No


In summary,

Xprog is a good universal programmer for various chips and MCUs in automotive.

But if you can pay more, i suggest you to buy vvdi prog


Tip: VVDI PROG vs Xprog-m vs R270 vs Orange5 clone:


  1. faster to clear 35080, 080D0, 160D0 (within 10S)
  2. more stable than Xprog-m to read MC9S12 series chips
  3. faster to attack MC9S12series chips
  4. less error than Orang5 to read some EEPROM that Orange 5 fail to recognize
  5. with voltage attack function for use
  6. with CAN bus,K-Line for use


So, VVDI Prog should be the best solution for ECU programming.

It covers chips that Xprog supports, works with less error than Orange 5, has the function of r260+r270


How to use Fgtech 4 Galletto v54 for EDC17CP14 read/write/checksum?

$
0
0

Topic: Is possible to read/write edc17cp14 with Fgtech 4 in boot mode??


Fgtech 4 EDC17CP14 Reviews:


Works great with FGTECH !


Tested in boot mode, read&write eeprom+flash ok


Galleto v54 clone read - write ok in bootmode


read write ok,but one time was somethink about checksum,and cannot write mod file,i did with Ktag


Tested ok read/write


I have tested clone, perfectly worked many times on this ECU, both reading/writing via OBD and boot mode. Regards!


Galletto v54 EDC17 Reviews:


Galletto v54 EDC17success:

EDC17CP14 03L906022G Read/Write ok (OBD and boot mode)

BMW edc17 in boot mode ok
BMW E87 116D 2.0 EDC17C06 Bootmode r/w ok
BMW X6 3.0D 2012 and 2013 (306 and 245hp)BOSCH EDC17CP45 read/write BOOT ok
bmw 3/5/7 series: edc16c31/35 obd r/w ok, edc17 in boot mode ok

bmw x3 edc17 read write ok

Landrover /jaguar EDC17CP11 read out in boot mode ok, not tried write yet.
citroen C3 II 2012read/wrote tricore EDC17C10 by bootmode , with a non reworked v54.

VW EDC17CP14 and Galletto v54 write in boot mode

PSA edc17cp10 no problem read/write


Galletto v54 EDC17 failed:

BMW F10 2010y EDC17CP45 TPROT10 on the bench...boot SAK1797 only ecu data...can not read ee not read int. flash
Jaguar xm edc17 read fail

Opel insignia Edc17c19 read ok write fail , Use fgtech v52 read ok write ok

Porsche 2012 MY - VAG EDC17CP44 readwrite in boot mode failed - could not disable TPROT
Sirius32 make a checksumm fail


Galletto v54 EDC17 Questions & Answers:


Q: Galletto works fine on VW EDC17CP14ecu?

A: Yes


Q: with edc17cp10 psa no problem read/write but with this cp14 vag not work even in bootmode and obd ( read ok in both)

A: CP14 shouldn't be problem on Tricore boot. I think you have broken ECU or device.


Q: Galletto v54 checksum not supported, how to do?

A: 0. Read Original ALL with Galletto boot mode. It will give you "All" file (4,224kb), internal flash+external flash+eeprom, (in my case).
1. Paste mod internal flash (make sure checksums are already correct) into the original 'all' file. Align correctly. Internal flash starts at 00, so it is easy.
2.Triple checkthat the paste is ok!
3. Flash modded "all" file in Galletto. This is done using "Write All" button.
4. It takes much longer to flash a file with differences. It took about 6+ minutes on first part - internal flash. It went to 100%, then to 75% and up to 100% slowly many times. Total over 10 minutes.
5. Read All to verify!
6. Compare with Hex Editor.

Car started, DPF functions are all gone.


Q: Is it possible to attempt to flash the big 4.2 MB 'all' file (int flash, ext flash, eeprom combined)?

can I paste my changes there, and checksums too?

A: The answer is YES

I flashed the original 4224kb 'all' file back to the ecu successfully. Galletto skips checksum correction for the ALL file.

Risky, but I guess I was brave enough. The boot pin accidentally untouched, and galletto stopped and told me to remove power and reconnect. WHILE FLASHING. Nearly peed my pants.

I repositioned boot pin, reconnected power, and it continued error free!

After, I did a verification read of all.

100% identical to original

Now I will paste my internal flash mods (with checksum corrected already) into the 4224kb file, and flash that.


Q: How to delete individual dtc codes from edc17 (cp14 was the flavor i was working with)?

A: example:

009298 - Diesel Particle Filter; Differential Pressure Sensor

P2452 - 000 - Elect. Malfunction - MIL ON


find the p code in the p code look up table. 16bit, hex.

location: 190a7a

p code table start: 190654

get your hex calculator!

190a7a - 190654: 426. divide by 2, 213.

find your vag specific dtc look up table. 8 bit.


example:

table start location: 18569e

18569e + 213: 1858b1. this is the location of the p2452 dtc. 00 this byte.

no more dtc light.

same process as me7 except /2 instead of /8.


Car OBD2 Tools global one-stop shopping supplier ---OBDexress.co.uk

VAS 6154 Clone vs VAS 6154 Original

$
0
0

Here we will talk about VAG diagnostic tools: VAS 6154 china clone vs VAS 6154A genuine


VAS 6154 genuine:


VAS 6154 ebay: US $2,591.70

vas-6154-original-1 vas-6154-original-2 vas-6154-original-3 vas-6154-original-4 vas-6154-original-5

VAS 6154 china clone:

VAS 6154 best price: US$119.00

Cloned VAS 6154 in UK:

http://www.obdexpress.co.uk/wholesale/vas-6154-odis-diagnostic.html


What is VAS 6154:


This VAS 6154 Interface is the latest interface for the diagnostic and programming applications VAG ODIS-S (Service) and ODIS-E (Engineering),it replaces the VAS 5054A.
Available for Off-board Diagnostic Information Engineering from version 6.2 onward and Off-board Diagnostic Information Service from version 3.0.3 onward.
The VAS 6154 can be used with all VW Audi Seat Skoda Bentley Lamborghini vehicles from 2000 onward including NEW & FUTURE MODLES under production.

The diagnosis interface VAS 6154 with wireless network technology supersedes remote diagnosis head VAS 5054A and diagnosis interface VAS 5055. It makes wireless transmission of data possible from the interface in the vehicle to the diagnosis unit.

If a wireless connection is not possible/permissible, the USB module is used, which guarantees a reliable wired data transmission to the diagnosis unit.


VAS6154 Infrastructure mode: 

In infrastructure mode, several network-capable devices can be connected together (network subscribers).
For a wireless network, a WLAN access point is required. This access point forms the connection to WLAN-ready subscribers.


VAS6154 point-to-point connection:

With point-to-point connection via a wireless network, VAS 6154 creates a radio network. VAS 6154 thereby adopts the role of a radio access point (Access Point). A direct connection is made between the diagnosis unit and the diagnosis interface VAS 6154.
VAS 6154 is configured using the web-based user interface.


VAS6154 Design and features:

VAS 6154 china clone interface comes with inner boards updated & improved a lot.


There are two 6154 versions: one with wireless network & USB modules and the other without wireless network module (the wireless network module can be retrofitted at any time provided national regulations permit).


Radio registration verified for the following countries:

A, AUS, B, BIH, BR, CDN, CH, CY, CZ, D, DK, E, EST, F, FIN, GB, GR, H, HK, I, IL, IND, IRL, IS, J, L, LT, LV, M, MEX,N, NL, NZ, P, PL, RA, RC, ROK, RUS, S, SGP, SK, TR, UA, UAE, USA, ZA


VAS6154 ODIS 4.13 Language Available:

English, Japanese, Portuguese, Romanian, Korean, Dutch, Polish, Turkish, Spanish, French, Italian, Croatian, Danish, German, Swedish, Finnish, Slovenian, Czech,
Russian, Greek, Chinese


VAS6154 ODIS 4.13 New Functions:

vas-6154-odis-4.1.3

– Estimated remaining times are shown for ECU flash operations.
– Diagnostic protocol contains interruptions of GFF sessions, extended measurement values, improved ECU communication view,
used diagnostic hardware, connection type of diagnostic hardware, operating system, the hotfix used and submissions of support requests
– The measured value display has been improved.
– Documents in GFF are displayed in separate windows.
– One message box will be shown at the beginning of the test drive mode.
– GFF hotfixes can be integrated during diagnostic sessions.
– Danger messages have been revised.
– Stopping of diagnostic sessions may be interrupted.
– Automatic deletion of autosave diagnostic protocols after successful transmission.
– Selection of PassThru diagnostic hardware has been improved.
– ODIS Service Software update has been stabilized.


VAS6154 Technical data:

Dimensions: approx. 136x48x25mm
Weight: approx. 150g
Power supply: 8-18V via vehicle connector
Output: approx. 5W
Temperature range: Storage -20°C to +85°C, operation -20°C to +40°C
PC interface (wired): USB 2.0 High Speed, 480 Mbit/s or Fast Ethernet, 100Mbit/s (via LAN module)
PC interfaces (wireless): WLAN 802.11 ab/b/g/n 2T2R 300 Mbit/s Client Mode (WPA2 EAP-TLS, WPA2 PSK)
AP mode (WPA2 PSK)

Package Includes:

1pc x Diagnosis interface VAS 6154
1pc x USB cable

 Scr :http://www.obdexpress.co.uk/wholesale/vas-6154-odis-diagnostic.html

How to connect wiTECH software to VCI Pod clone

$
0
0

You don’t need the USB cable or power cord for everyday use. As long as the wiTECH VCI POD is connected to the car (it gets power from the OBD plug), the unit can be connected via ethernet. Keep in mind, there is no DHCP server on the ethernet port so you need to set both your computer and VCI POD to a fixed IP address. My ethernet on the chinese clone did not work out of the box. See below for further troubleshooting.
Problem: Cannot connect to VCI POD via Ethernet. Keep getting 169.254.x.x as IP address.

Solution: Need to change Network Settings on VCI POD

A 169.254.x.x means the computer has a physical ethernet link, but cannot get an IP address from your router/pc.
1. Set computer to fixed IP address 192.168.0.1
2. Connect USB to VCI POD
3. In web browser, connect to 172.22.22.22
4. Under Network Settings, change radio button from “Obtain an IP address automatically from a DHCP server” to “Use the following IP address and settings”
5. Under IP Settings, change IP Addr: 192.168.0.10
6. Disconnect USB.
7. Plug in Ethernet to VCI POD and computer. Connect power cable to VCI POD (or connect to OBD).
8. In web browser, now connect to 192.168.0.10 (it will also be visible in WiTech)
Problem: Connect VCI POD to notebook and VCI lights (safe, wlan, busy, and rec) are blinking permanent. wiTECH does not recognize the VCI.

Solution: Need to enter recovery mode and manually update VCI POD. (Could be a wiTECH software version and VCI POD firmware mismatch)

1. Put empty card into wiTECH
2. Connect to notebook by LAN not USB
3. Run IE and go to address 172.22.22.22 (or fixed IP address you manually assigned), select software update, and in dcc tools folder select recovery file with zip extension
a. Look at the folder Program FilesDCC ToolswiTECH Serverinstallbundles vservera.upgrade-mpvci-x.x.x.zip
b. On Windows 10 x64: C:Program Files (x86)DCC ToolswiTECHjserverinstallbundles vservera.upgrade-mpvci-x.x.x.zip

Tip: In the file name “vservera.upgrade-mpvci-x.x.x”, the x.x.x is the firmware version you should have loaded on your VCI POD to have it work correctly with the wiTECH software version currently installed on your pc. The VCI POD firmware version can be verified at the top left corner of the 172.22.22.22 unit homepage labeled as “System Release”.


Random Tip

Contents of VCI POD SD Card are hidden. Windows cannot mount or view. Linux can! (hint hint)


http://www.obdexpress.co.uk/service/witech-vci-pod-chrysler-diagnostic-technical-support-256.html

Where to download Mazda IDS v106 software

$
0
0

Free download Mazda IDS v106 software to work with Vxdiag Vcx Nano Mazda:

http://pan.baidu.com/s/1qYnwXIk

Password: r5oi

Released by Allscanner Vxdiag Vcx Nano

Allscanner Vxdiag Vcx Nano Mazda


Mazda IDS 106.00 download free on Mega:IDS 106.00

https://mega.nz/#!qgYzRSqR!wRrh4jDELcFVG2YISV6P-_nFKpJKgDChyqo2H-rEGmE

IDS 106.02

https://mega.nz/#!2t5CADKR!dfjtRV2_yC4TFtZkaBXPx_rku3ejY5K97Cz_tVgLyQU

No pass

Shared by SCOTT via the MHH forum


How to setup Vxdiag Vcx Nano Mazda IDS 106:

Install M-IDS, install latest VCX Manger, update the firmware and your good to go.


Why Mazda IDS 106 say it’s 105 version:

You may get that error that installed version is not 106.00 … and even when you run the 106.00 installation again … it says it’s 105.06A.

Just edit reg to match the one your trying to install.

Then it should install.


How to setup Renault CAN CLIP software on Macbook Mac OS X?

$
0
0

Renault CAN CLIP On Mac OS X reviews here :

 
Renault CAN CLIP  works perfectly on Macbook Air 2013 / os x 10.9.x / vmware Fusion / windows xp sp3 as guest. When you connect an interface, you have two devices (ISO + CAN), which must be recognized in the virtual machine.

I managed install Clip 146 on MacBook Air with VMWARE FUSION and Windows 7 32 bit.

It works well.


I have a running Windows 7 on a virtual machine over Mac OS X Yosemite with Parallels.

When I connect my CAN Clip, Windows doesn’t recognize the hardware.

Windows can’t detect the unit. But I tested the CAN Clip in a native Windows 7 and It was detect without problems.


[HELP] how to help Windows (Virtual Machine) to detect my sonde ?

Verify the usb connection is enable on the virtual machine on the lower-right side.


[VIDEO] how to run Renault CLIP diagnostic software on Macbook Pro?

[NOTE] Renault CAN CLIP what windows can work on?


Renault CAN CLIP windows 7: YES

Renault CAN CLIP windows XP: YES


Renault CAN CLIP windows 8: need luck

Renault CAN CLIP windows 8.1: need luck

Renault CAN CLIP windows 10: need luck


Examen de l'outil multi-outils Allscanner VXDIAG Ford / Mazda

$
0
0

Bonjour les gars, je fais un examen sur l'outil de diagnostic Multi Allscanner VXdiag (Ford / Mazda / Honda / JLR / Toyota / Subaru).

Je possède l'un d'entre eux avec une licence pour Ford / Mazda / Honda / JLR.

VXDIAG multi outil de diagnostic Ford / Mazda

J'ai eu des problèmes pour l'utiliser avec Ford / Mazda IDS au début, mais maintenant je suis arrivé à un point où je réussis à l'utiliser pour la programmation des voitures Ford / Mazda.

Pour être honnête ... c'est la seule fonction que je cherchais ... Programmation ou reprogrammation des modules Ford / Mazda, mais j'ai eu une licence de Honda et JLR pour 10 $ supplémentaires, donc je suis allé pour ça, mais le logiciel Honda HDS qui fonctionne avec elle est très ancien ... (3.014 ... inutile) et je me sens plus en sécurité pour exécuter JLR avec mon Cardaq +

NE PAS INSTALLER PASSTHRU DRIVER, SEULEMENT FORD VCM2 DRIVER

Je pense que c'est la raison principale pour laquelle je n'ai pas pu programmer de module ... maintenant que je n'utilise que le pilote VCM2, ça marche.

Je fais une liste des fonctions que j'ai essayées et le résultat de ces tests.

2005 Ford Five Hundred (3L) Ford IDS 101.4 (VM)

Réorganisation du module GEM - SUCCESS

2008 Mazda 3 (2L) Mazda IDS 103.02

Programmation du module PCM - SUCCESS

2007 Ford Expedition (5.4L) Ford IDS 101.4 (VM)

Installation du module DSCM (PMI) - SUCCESS

LTM Liftgate / module de coffrage reprogramme - SUCCESS

La reprogrammation du module PCM - FAILED (a dû utiliser FMP)

Edit: Allscanner a confirmé le problème avec le moteur 5.4


Src:

http://obd2expresscouk.publicoton.fr/examen-de-l-outil-multi-outils-allscanner-vxdiag-ford-mazda-935074

How to use CR508 Common Rail Pressure Tester

$
0
0

CR508 Common Rail Pressure Tester and Simulator not only can test rail pressure functions, but works good at its simulation functions is very useful to simulate oil pressure of high pressure fuel line,conveniently find and search problems on fuel line, fuel pump or sensor etc..


CR508 Common Rail Pressure Tester and Simulator


1 common rail pressure measurement

when the vehicle fuel way is abnormal, please be sure to stop the car and pull the hand brake. the key should be turn off. CR508 simulation measurement switch is moved to automatic measuring gear. car common rail pressure sensor is searched. Bosch rail pressure sensor location is shown in the box of the following figure:

CR508-Common-Rail-Pressure-Tester (1)


rail pressure sensor joint on common rail sensor is removed. corresponding male joints of CR508 (Bosch joint for Bosch sensor, Denso joint for Denso sensor, and Delphi joint for Delphi sensor) are inserted in the sensors as below:

CR508-Common-Rail-Pressure-Tester (2)


corresponding female joints are inserted to joins connected with ECU, which are removed from the sensor. Generally speaking, measurement joints of CR508 are connected in series between original car rail pressure sensor and connector. when the joint is assembled or disassembled, pin direction should be positioned; otherwise, the sensor or plug can be damaged. the dashed line represents connection mode as shown in the following figure;

CR508-Common-Rail-Pressure-Tester (3)

the CR508 power cord is connected to the car battery. the key switch is moved to the ON position for starting the car. then CR508 will automatically boot for measuring common rail pressure. measurement results can be displayed. users can check problems in the fuel way according to measurement results.


Here is the display interface of CR508 Common Rail Pressure Tester


CR508-Common-Rail-Pressure-Tester-display

the following failures happen because of abnormal rail pressure:

1) it’s difficult to start engine or the engine cannot be started

2) the engine power is insufficient

3) the engine suffers from climbing weakness

4) the engine power is unstable and fluctuates


2 simulation of common rail pressure

first, CR508 measurement and simulation switch is moved to sensor gear that should be stimulated. there are three gears for selection, namely simulation of Bosch rail pressure sensor, simulation of Denso rail pressure sensor, simulation of Delphi rail pressure sensor. after selecting the corresponding gear, the joint of CR508 corresponding sensor is connected to the car or test platform that should be stimulated. CR508 is electrified.

then correctly stimulated sensor is displayed on the sensor type of the display screen. the stimulated rail pressure is displayed on the measurement results. the rail pressure simulation regulator is rotated for adjusting simulated rail pressure and realizing change of rail pressure


Src:

R280 BDM programmer work perfect on BMW F series CAS4

$
0
0

R280 BDM programmer is verified to work perfect with BMW F series and BMW CAS4 cars.


Here is the car and ECU list... Tested no issues by uob


Support R280 BMW F series:

BMW 1 series – F20, F21 chassis – pre-2016

BMW X1 series – E84 chassis – pre-2016

BMW 3 series – F30, F31 and F35 chassis – pre-2016

BMW X3 series – F25 chassis – pre-2016

BMW 5 series – F10, F11 and F18 chassis – pre-2016

BMW X5 series – F15 chassis – pre-2016

BMW 6 series – DMEM/F12 F13 chassis – pre-2016

BMW X6 series – F16 chassis – pre-2016

BMW 7 series – F01, F02, F03, F04 chassis – pre-2016

BMW GT series – F07 chassis – pre-2016

Support for BMW EWS4 (2L86D).

Support EZS:

1J35D/2J74Y/4J74Y/0L02M/1L02M/3K85K/3K91D/1L85D/1L59W/3L40K/4L40K, etc.

Support a variety of SRS computers:

9H91F/0K13J/0K75F/0L85D/0J38M/1E62H/1K79X/5H55W, etc.

Support M35080 series:

quick wipe, read and write 35080/35080-V6/35080-VP/080D0WQ/160D0WQ/35160, etc.

Support FLASH 0K50E online write.


Support for BMW CAS and CAS4 (0K50E/2K79X/0L01Y/0L15Y/1L15Y, etc.).

R280 CAS4:

R280-BMW-CAS4-programmer-read-write-5M48H-eeprom-(1) R280-BMW-CAS4-programmer-read-write-5M48H-eeprom-(2) R280-BMW-CAS4-programmer-read-write-5M48H-eeprom-(3) R280-BMW-CAS4-programmer-read-write-5M48H-eeprom-(4) R280-BMW-CAS4-programmer-read-write-5M48H-eeprom-(5) R280-BMW-CAS4-programmer-read-write-5M48H-eeprom-(6) R280-BMW-CAS4-programmer-read-write-5M48H-eeprom-(7) R280-BMW-CAS4-programmer-read-write-5M48H-eeprom-(8) R280-BMW-CAS4-programmer-read-write-5M48H-eeprom-(9) R280-BMW-CAS4-programmer-read-write-5M48H-eeprom-(10) R280-BMW-CAS4-programmer-read-write-5M48H-eeprom-(11) R280-BMW-CAS4-programmer-read-write-5M48H-eeprom-(12) R280-BMW-CAS4-programmer-read-write-5M48H-eeprom-(13) R280-BMW-CAS4-programmer-read-write-5M48H-eeprom-(14) R280-BMW-CAS4-programmer-read-write-5M48H-eeprom-(15) R280-BMW-CAS4-programmer-read-write-5M48H-eeprom-(16) R280-BMW-CAS4-programmer-read-write-5M48H-eeprom-(17) R280-BMW-CAS4-programmer-read-write-5M48H-eeprom-(19) R280-BMW-CAS4-programmer-read-write-5M48H-eeprom-(20) R280-BMW-CAS4-programmer-read-write-5M48H-eeprom-(21) R280-BMW-CAS4-programmer-read-write-5M48H-eeprom-(22) R280-BMW-CAS4-programmer-read-write-5M48H-eeprom-(23) R280-BMW-CAS4-programmer-read-write-5M48H-eeprom-(24) R280-BMW-CAS4-programmer-read-write-5M48H-eeprom-(24) R280-BMW-CAS4-programmer-read-write-5M48H-eeprom-(25)

Src:

Kess V2 5.017 No Wake Up Error

$
0
0

Usually, you have Wake Up Error with old Kess V2, esp. Kess firmware 3.099. But now, new kess v2 programmers hardly ever pop up “Wake Up Error” when reading kess software number.


Kess v2 without Wake Up Error:

Kess v2 5.017 (so far, no)


Kess with Wake Up Error:

Kess v2 4.036 (sometimes)

Kess with Wake Up Error:


Here is an awesome write-up of “Wake Up Error” solutions:


- Here are the files for Kess SD or TF card. Just reformat your card and copy the files onto it.


- Sometimes wake up error doesn't mean your tool has problem, i use Kess original. when the ECU was tuned and locked. it will show wake up error too ...

Please be specific what car, ECU you working with. its difficult to tell whats wrong here ...


- Maybe conflict in drivers if you have other tools on your pc, try to remove other drivers,and reinstall only kess drivers, have work for me one time


- Firstly try installing genuine software 2.20 will be fine, once installed then un-install it! Use your software (no point going past 2.08/2.11) if it still gives wake error try removing battery in vehicle for 30 mins and try again, or in 'tools' slow the read speed down to minimum! if still no joy just take it out and do it on the bench!


* all above are customer solutions (credits to all contributors); no one but yourself should hold responsibility of what you’ll try.


* if all solutions don’t work for you, please go to http://blog.obdexpress.co.uk/2015/07/29/kess-v2-v2-13-firmware-v4-036-wake-up-error-fixed/ (credits to professionals working for obdexpress.co.uk)


Scr:

(Solved) Ford VCM IDS 3: “not VCI” and “not license”

$
0
0

Tech support from obdexpress.co.uk:

Ford VCM IDS 3 with error messages “not VCI” and “not license”


Not connected to VCI (No VCIs Detected)

SOLVED-VCM-IDS-3-not-VCI-not-license-1

IDS software - Production license not found

An active IDS software license is not found and is required for vehicle communications.

SOLVED-VCM-IDS-3-not-VCI-not-license-2 SOLVED-VCM-IDS-3-not-VCI-not-license-3

Solved!!

Go to FVDI2 Quick Start, then IDS Ford, then start Ford diagnostics here.

Works like a charm.
SOLVED-VCM-IDS-3-not-VCI-not-license-4
Note: you are supposed to update IDS software before using FVDI2 Quick Start


Terminator Software V4.6 Download Link:

https://mega.nz/#!ONol3TpY!t4z81urv8gPNEzIa4vYbK0uXrz_aFYYb2OpA7tq8DME


ford ids v106.01 software download free: (only tested with VCM IDS 3 )

https://mega.nz/#!LERyzJqI!KRokMKKIbEBB-sQ44aIAscN1pffUGRpoWT5L-A3f7nk


mazda v106 software download free: (only tested with VCM IDS 3 )

https://mega.nz/#!SBwznArD!wRrh4jDELcFVG2YISV6P-_nFKpJKgDChyqo2H-rEGmE

(Source:http://blog.obdexpress.co.uk/2017/08/31/solved-vcm-ids-3-not-connected-to-vci-license-not-found/)

Tech2win + Tech2 Opel PCMCIAV123-V182 Download FREE

$
0
0

Free download Tech2win + Tech2 Opel PCMCIA V182 V161 V160 V159 V158 V157 V152 V137 V124 V123 multi-language (English, Spanish, German,)


THE MOST IMPORTANT NOTE:

NO ONE BUT YOURSELF HAVE TO HOLD RESPONSIBILITY OF TECH2 BIN FILES & TECH2WIN BIN FILES BELOW: free, but not tested by professionals!!!!!!! unknown security and perhaps high risk sometimes!!!


OPEL-TECH2-32MB-V182.000_en.part02.rar


Opel 161.002.rar (free, try on your own rsik)


Opel160.000 EN

Cadillac 117.500

Cadillac BLS 120.000

China-1 29.002

Isuzu truck 11_530 1996-2011

Isuzu truck 11_530

ISUZU Truck CAN 122_050

opel_160-000_en

suzuki 29.003 eng

V33-002_NAO_EN

vauxhall


Opel vauxall v159 English


Opel Tech2Win 158.000


Opel tech2win 157


Tech2win PCMCIA Opel 152 Russian 


Opel vauxall 152.00 Spanish.rar


Opel 137.000

isuzu 107.021

nao 32.08

opel 137.000

saab 148.000

suzuki 28.007


Tech2Win version1.301


Opel - Vauxhall 124.000 English.rar

NAO 30.007 English.rar

NAO 30.007 German.rar

nao 31.011.rar


Opel - Vauxhall 123.000 German.rar


Opel - Vauxhall bin file Version 123.000 multi-language


Password for ALL:Patrian Automotive Industries


Good news for you!!!!!!! You have tested tech2 bin files, use with security!!


Tech2 + Tech2win:100% working

Tech2Win PCMCIA 32GB Card Bin Files: 100% working

software includes:

Tech2Win GM      English 32.007

Tech2Win SAAB    English 148

Tech2Win OPEL    English 180 (Cars from 1997-2014)

Tech2Win Holden   English 149 (Cars from 1999-2013)

Tech2Win SUZUKI  English  01.210.020

Tech2Win ISUZU    English  K line 11.53;

Tech2Win ISUZU    English  CAN line 107.021


GM

GM-English 33.004 1991-2013

GM-Germany 32.007 1991-2013

GM-Spanish 31.007 1991-2013

GM-French 32.007 1991-2013

GM-Portuguese 32.007 1991-2013


OPEL
update to V180

OPEL-English 173,000 1997-2014

OPEL-Italian 133.001 1997-2014

OPEL-Germany 85.001 1997-2014

OPEL-Spanish 91.001 1997-2014


SUZUKI

SUZUKI-English 01.210.020


SAAB

SAAB-English 148,000


ISUZU

ISUZU CAN BUS-English 107.021 2006 to 2010

ISUZU-K-line is for ISUZU from 1998 to 2011


Holden

Holden-English 149,000 1999-2013


For 12V CARs only (no trucks)!!!

Diagnostics: cars from 1991 to 2013

Programming with TIS2000: cars before the 2007 year


(You are taking risk when programming a car, so it’s 100% necessary to use a 100% working softwareTIS2000. For software untested, forget it. HIGH RISK!!!!!!!!!)


Enjoy!!!


Vpecker-E4 Professional OBDII Diagnostic Tool Vpecker E4

$
0
0

Good news !Vpecker E4 Professional OBDII Diagnostic Tablet will come to OBDexpress.co.uk,here  is the Vpecker-E4 introduction.

Vpecker E4, android based multifunctional diagnostic tool with 8 inch tablet developed by IDUTEX, covering over 78 manufactures from Asia, America, Europe, Australia, featuring powerful diagnosing functions with overall special functions(resetting&coding&programmin g) , data replay, data analysis, It meets the customer’s requirement and would be the best choice for workshops and mechanics.

Main Interface

vpecker-e4-main-interface-1 vpecker-e4-main-interface-2

Hardware

vpecker-e4-hardware vpecker-e4-hardware-2


Main Function

vpecker-e4-main-function


Vpecker-E4 features

• 8 inch multi-touch screen.

• Support multiple 23 languages.

• One key update/logging/test report/feedback/function list via WIFI

• Extensive vehicle coverage for most US, Asian ,European and Australian vehicle

makes.

• Automatically Wi-Fi update.

• Powerful diagnostic functions and coding/restting/programming.

• Work stably and smoothly in high and low temperature environment.

• Complete function including live data, ECU programming and so many others.

• Unparalleled OBDII functionalities-support ALL 5 OBDII protocols and ALL10

test modes.

Vpecker E4 diagnosis Vehicle Coverage

• Asia:

Acura, ASIA GM, Daewoo, Daihatsu, Honda, Hyundai, Infiniti, Isuzu,

Kia, Lexus, Para Mazda, Mitsubishi, Nissan, Perodua, Protón,

Ssangyong, Subaru, Suzuki, Toyota, Tata, Mahindra, MARUTI.

• European:

Abarth, para Alfa, para Aston, Audi, Bentley, Mercedes Benz, BMW,

Bugatti, para Citroen, Dacia, Ferrari, Fiat fordeu, Jaguar,

Lamborghini, Lancia, Landrover, Maserti, Mini Cooper, Opel, Peugeot,

Porsche, Renault, Saab, Seat, Skoda, elegante, Vauxhall, Volvo, VW.

• America

Chrysler, Ford, USA GM, Jeep, Scion.

• Australia:

Holden, Ford (Australia).

• China:

BYD, Changan, Changhe, Chery, Emgrand, Englon, Foton, Geely,

GLEAGLE, GWM, HBSH, Huachen, Lifan, Wuling,Yuan..

• OBD-II:

Chrysler, Ford, USA GM, Toyota, Lexus, Honda, Hyundai, Kia, Mazda,

Mitsubishi, Nissan, Subaru, Suzuki, Abarth, Aston Martin, Bugatti,

Ferrari, Lamborghini, Maserti, Benz, BMW, VW, Audi, Seat, Skoda,

Porsche, Jaguar, Land Rover, Volvo, Saab, Alfa .

Diagnosis System Coverage

ME-Motor electronics

CDI-Common Rail Diesel Injection

ETC-Electronic transmission control

ESM-Electronic selector module

SBC- Sensotronic Brake Control

ESP-Electronic stability program

BAS-Brake assist

Suspension

TPC-Tire pressure monitor

Airbag

CGW-Central gateway

EIS-Electronic ignition switch

OCP-Overhead control panel

UCP-Upper control panel

XALWA-Xenon headlamp

HRA-Headlamp range control

ATA-Anti-theft alarm system

IC-Instrument cluster

ASSYST-Active Service System

SCM-Steering column module

EPS-Electrical power steering

PTS- Parktronic system

EPB-Electric parking brake

COMAND/AUDIO

CD/DVD

TV tuner

CTEL-Cellular telephone

DCM-Door control module

ESA driver-Electric seat adjustment driver

ESA passenger-Electric seat adjustment

passenger

AAC-Air conditioning

WSS-Weight sensor system

SVMCM-Special vehicle multifunction control

module

etc….

Vpecker E4 Function Coverage

Quick Test

Read ECU Info.

Read DTCs

Erase DTCs

Clear learning value

Data Stream

Actuations

Read freeze frame data

Read/Write VIN

Basic Reset

Control unit adaptations

Throttle adaptations

Air bleeding

Level calibration

Theft alarm Reset

Key programming

Oil change, Idle speed learning

Idle speed Adjustment

Ignition timing adjustment

Camshaft timing control learning

Maintenance functions

ECU Initial startup

ECU initialization

etc

Product package

vpecker-e4-product-package

Product specification

vpecker-e4-specification


On Vpecker-E4 info  will continue to add...


Vxdiag Vcx Nano download FREE with reviews (09.2017)

$
0
0

Latest update at  Sept.11th,2017,Free download Allscanner Vxdiag Vcx Nano diagnostic software the latest version for Honda, Ford, Mazda, VAG, Subaru, GM, Jaguar and Land Rover. And Vxdiag Vcx Nano reviews of OK and K.O. experience for you.

 Part 1: Vxdiag Vcx Nano software download


FORD IDS V100 EN/CN

Ford IDS 106 EN


Mazda IDS 106.00.exe 485.1 MB


GM Tech2Win16.02.24.rar 138.9 MB

GM GDS2 VM.iso 3.95 GB


2016.4 Subaru SSM.iso 1.95 GB


JLR SDD software

JLR SDD patch.rar 47.4 MB


ODIS Service 4.1.3

ODIS-S 3.03

VAS-PC V19 EN5054.rar 3.48 GB


Part 2: Vxdiag Vcx Nano best price


Vxdiag Vcx Nano for sale:


Part 3: VXDIAG VCX Nano reviews


VXDIAG VCX Nano Mazda Review:


The VCX Nano I took apart seems to be a custom design to emulate in hardware part of the hardware/software of the VCM II but the driver is most important too. I did not take pictures but gently peeling down the stickers reveals 4 screws. Once inside it is a very simple board with a ST micro cortex M4 STM32F4 Series based micro controller doing the work. The FT serial to usb chip-set and some caps and a space that was blank for I assume either the WIFI or Bluetooth module. I googled the device and did see a Russian site where a guy took apart a VW version and it had more chips and and older generation micro-controller.

Soldering looks like reasonable quality surface mount and no hand work or redo's.


Vxdiag vcx nano gm review:

I have one oof these, You need a 64bit version of windows to run the GDS system on VMware, it's already supplied as a VM machine, the Tis software works perfect under windows (not VM) comes with installer

I haven't have any problems, I use the USB facility although it does have wifi also


VXDIAG Vcx Nano Ford Review:


VXDIAG VCX NANO is the same as VCM2 with a single board (which is very bad clone of VCM2).


By satria_wr

Vehicle: 2014 Ford Ecosport 1.5L Ti-VCT 110hp


My clone vcm2 was able to update the module online.

The single board is known to brick module since it doesn't have complete chip on it.


By Automate

Vehicle: 2010 Ford Fusion Hybrid


The VCX Nano I took apart seems to be a custom design to emulate in hardware part of the hardware/software of the VCM II but the driver is most important too. I did not take pictures but gently peeling down the stickers reveals 4 screws. Once inside it is a very simple board with a ST micro cortex M4 STM32F4 Series based micro controller doing the work. The FT serial to usb chip-set and some caps and a space that was blank for I assume either the WIFI or Bluetooth module. I googled the device and did see a Russian site where a guy took apart a VW version and it had more chips and and older generation micro-controller.

Soldering looks like reasonable quality surface mount and no hand work or redo's.


By stvkram

Vehicle: 2003 Mazda 6 3.0 V6 220hp


I test this tool, i buy the wifi version. Ford/GM/Toyota/VW/JagLR all works with wifi or usb connection :D


By satria_wr

Vehicle: 2014 Ford Ecosport 1.5L Ti-VCT 110hp


I own VXDIAG VCX Nano WiFi. I use IDS v103.xx fine without issue. Latest update of VXDiag gives it a better stability when doing programming.


Tony Back

Vehicle: Ford Focus


Well, I just took the chance and bought one.

Couldn't figure out how to get WiFi working on it, so I installed the driver

for USB and used USB instead.

Forscan detected it as J2534, and no errors was reported.

It didn't find as many modules as my Vlink adapter does, but it had

the same missing fuel trims for bank 2 for my Scorpio 24V  ;)


One hurdle with this device though - it is almost impossible to connect it

to the Scorpio, because the plug is a bit hidden, and this device is very big.

Anyone buying it should consider, if a small OBD2 extension cable is needed too.


By Yoda

Vehicle: Scorpio 2,9 24V 207HK 1997


I can add that regarding the VCX Nano for ford/mazda, I took mine apart and no bluetooth module is present. The bluetooth capabilities advertised on the main Allscanner site it not accurate. I can not speak for the WIFI version but I have the usb version and have used it with my 2003 Mazda 6 V6 and AFTER installing the "pass-thru" driver (J2534) it works perfectly and fast with FORSCAN.


By stvkram

Vehicle: 2003 Mazda 6 3.0 V6 220hp


Full chip high quality VCM II (SP177-C) is much better than VXDIAG NANO.

But be careful programming!


By ipy1975

Vehicle: 2015 Ford Mustang GT 5.0L V8


Genuine vs Clone Nexiq USB Link 2

$
0
0

I have the original Nexiq USB Link 2 and the clone.  Nexiq USB Link 2 genuine and the clone, any difference? 

Many talks about differences of Nexiq the original and clone. I have the original Nexiq USB Link 2 and the clone. Here share something with you all. Hope it helps.


THE PACKAGING

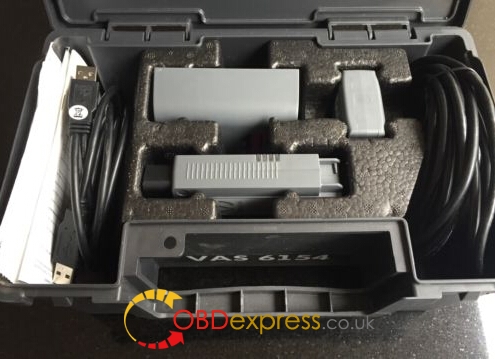
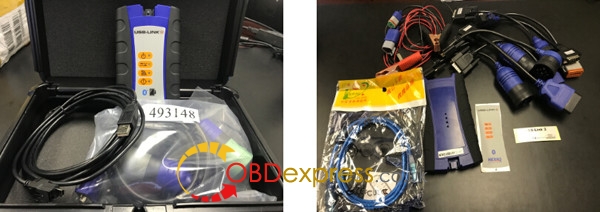
Lets start with the most simple way to tell the difference, and that is the packaging. This not only includes what the product looks like, but the included accessories as well. Throughout this post, we will be posting side-by-side images, with the genuine Nexiq USB Link 2 on the left, and the china clone USB Link 2 on the right. As you see from the pictures below, the genuine USB Link 2 comes in a nice, hard plastic case. The image on the right is from the China clone, which comes with no case at all. The cables and adapter have been stuffed in the box.

Nexiq-USB-Link-2-Bluetooth-genuine-vs-clone-1

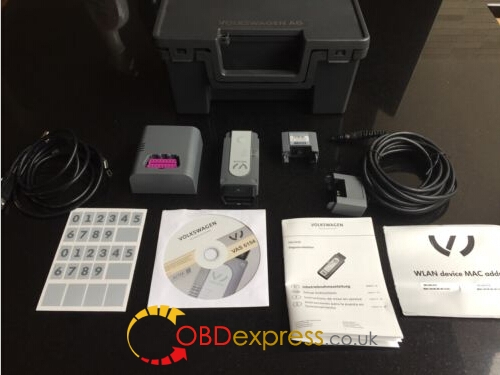
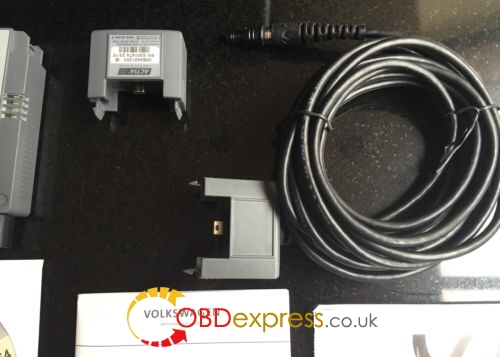
We also then take the contents out to compare. The original device, again shown on the left, comes with the adapter (with all the stickers attached), 6/9-pin long cable, a special USB cable (Which we will discuss more on this later), along with some paperwork. The USB Link 2 clone adapter comes with a HUGE assortment of cables, covering pretty much everything. It also has loose stickers to place on the tool, along with a 3-disc DVD set

Nexiq-USB-Link-2-Bluetooth-genuine-vs-clone-2

In summary, the genuine USB Link 2 will come in a hard plastic case and will only come with the USB Cable and 6/9 pin cable. The fake and clone adapters from China and beyond will come with a large assortment of cables, along with multiple DVD discs.

THE CABLE CONNECTOR

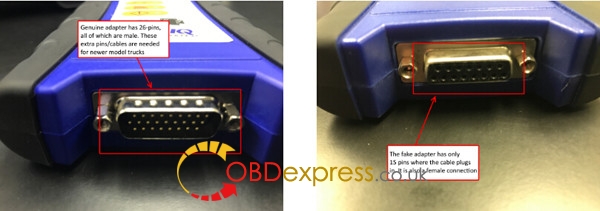
So far, not a huge deal. You can save $400, and not just get a cheap plastic box, right? Well, there are many more differences, so lets start with the cables and the connector on the Nexiq USB Link 2. Again, the image on the left is what the bottom connector looks like on the genuine adapter. The image on the right is the china clone.

Nexiq-USB-Link-2-Bluetooth-genuine-vs-clone-3

In summary, the genuine USB Link 2 will come with a 26-pin male connector for the cables, while the clone USB Link 2 will come with a 15-pin male connector. Remember, Nexiq put an authentication chip in each cable, so how possibly can these clones be doing this? The answer is that the china clone adapters are simply Nexiq USB Link original circuit boards placed in USB Link 2 cases. We will continue to prove this point as we move on.

THE CABLES

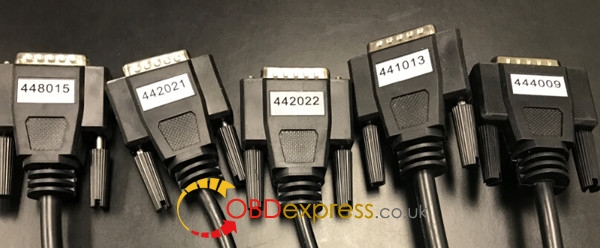
One thing that people may like about the China USB Link is that it comes with a wide assortment of cables — 8 different ones. The original only comes with the standard 6 & 9 pin cable, which is used on commercial trucks. The first thing we notice, is that the part numbers are on labels from the China device. Upon inspection of these cables, we find these are all cables for the Nexiq USB Link original, NOT the new USB Link 2. This further proves the point that the China adapter is just an original USB Link in disguise

Nexiq-USB-Link-2-Bluetooth-genuine-vs-clone-4

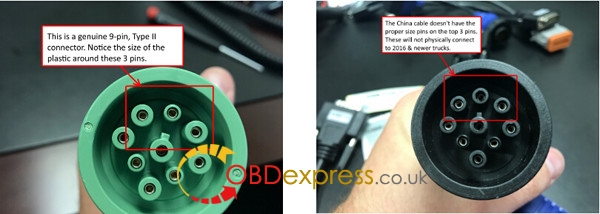
The other issue is that the included 6/9 pin cable from the China clone is NOT the new green 9-pin that has been used in all model 2016 model year trucks. This means that this cable will not physically connect to any trucks built in 2016 or newer. Even if you had the correct cable, we have serious doubts that this China clone is cable of handling the new 500k bus speeds that use this green connector.

Nexiq-USB-Link-2-Bluetooth-genuine-vs-clone-5

In summary, the USB Link 2 clone from China comes with more cables, yet they are cables for the original USB Link. The included 9-pin from China also will not fit or work on 2016 model year and newer trucks.

USB CABLE

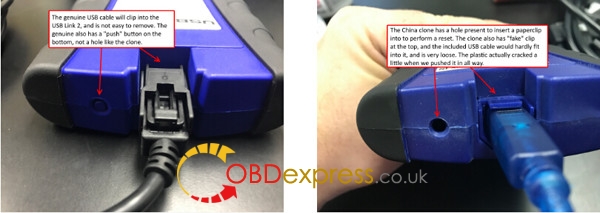
The USB connection port is also different on China knock-off versus the genuine USB Link 2. With the USB Link 2, there is a fancy clip on the USB cable to prevent it from being detached from the adapter. On the clone tool, we find that it is a “regular” USB cable connector, like you would find on a printer or larger USB device. On the USB Link 2 clone we received, this cable was actually very difficult to push in, and the plastic cracked a little when we did. Yet again, another reason to stay away from this tool and prove that it is a fake/clone.

The other important item to note is that on the clone/fake adapter, you will see that there is a hole in the bottom. On the genuine adapter, this is an actual button that you would push.

Nexiq-USB-Link-2-Bluetooth-genuine-vs-clone-6

CIRCUIT BOARD

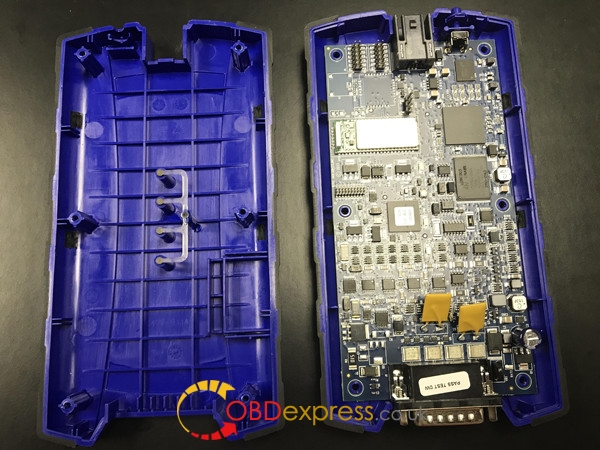
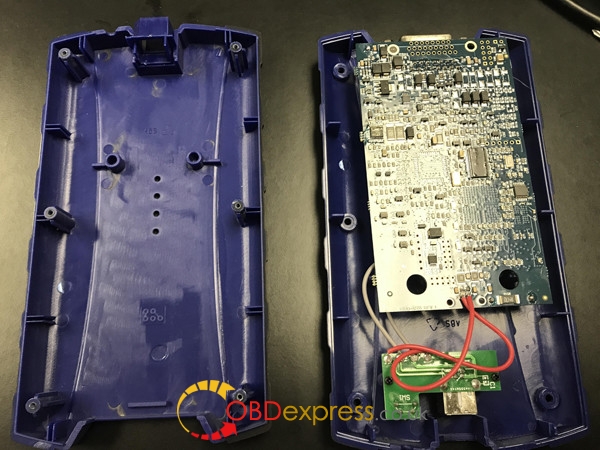
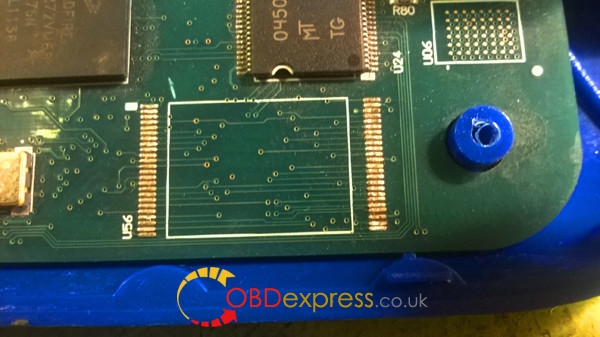
Now that we’ve explored all of the components, lets take a look at the actual circuit board inside the adapters. Again, we have the genuine adapter on the left and the China clone on the right. Without being a computer engineer, you can see the differences in the boards right away. The clone adapter is actually 2 circuit boards, with wiring in between, while the original is a solid, once piece circuit board. The clone version also contains no Bluetooth chip, so it is USB only.

the genuine PCBNexiq-USB-Link-2-Bluetooth-genuine-pcb

the clone PCB

Nexiq-USB-Link-2-Bluetooth-clone-pcb

NEXIQ USB LINK 2 CLONE STICKER COMPARISON

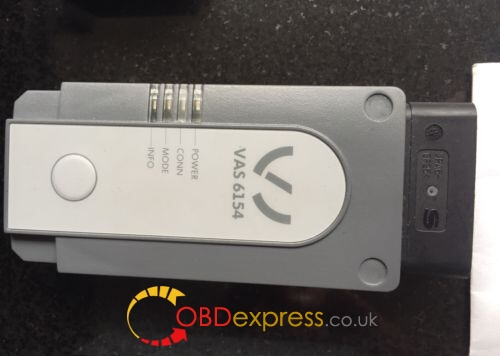
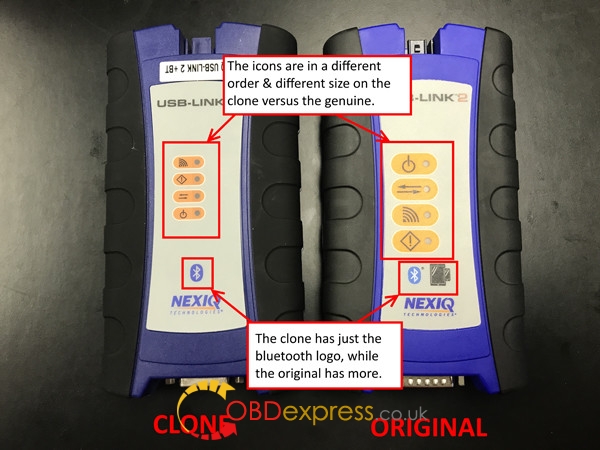
We also thought it a good idea to show you the adapters side-by-side. In the first view of the front, you can see some noticeable differences. The sticker on the front, while the same size, has the order of the LED lights and also the size of the icons different. Both adapters will show the Bluetooth Logo, however the China version does not have Bluetooth built into it. The genuine adapter also shows an icon for an iPad and iPhone.

On the back side of the adapter, the sticker is a completely different size and much smaller on the USB Link 2 clone. There is also far less information, including the fact that is says “Made in China”, while the original does not.


Nexiq-USB-Link-2-Bluetooth-genuine-vs-clone-8

SUMMARY

In summary, we highly suggest staying away from the USB Link 2 clone adapters. Using a USB Link 2 clone will cause you nothing but problems, and just isn’t worth the hassle of saving a couple dollars. There are plenty of other RP1210 adapters that are priced less then a Nexiq USB Link 2, and are also made by legit manufacturers in the USA. The following is a list of things you can look for if you are thinking about purchasing one:

  • It doesn’t come in a black plastic case
  • It comes with more then just the 6/9 pin “long” cable
  • The connector on the bottom is a 15-pin female
  • The 9-pin connector isn’t green
  • The USB cable doesn’t “clamp” into the Nexiq USB Link 2
  • There is a hole at the bottom of the tool where the cable plugs in
  • The sticker on the front looks different then it should

Of course If you are a DIYer, the clone is OK for you. But you should have a HQ Nexiq clone. For cheap craps, forget it. You’ll get what you pay for. 100% certain.


Be careful to buy a Nexiq clone off


I have had several people having issues with all the lights blink and they can not connect any more, you can not get warranty on Chinese clones so you are out of luck. Also Chinese clones are made with much lower quality than the real Nexiq.

I have had so many support issues that ended up being bad Chinese Nexiq adapters that I warn customers that if they have a Chinese adapter, they are on their own, I don’t support them and Nexiq won’t warranty them. Be Very careful who you buy a Nexiq off of. TRVideo is a supplier of the real Nexiq and has great support so that is the only source I recommend (Truck Parts Today)

http://www.obdexpress.co.uk/wholesale/nexiq2-usb-link-software-diesel-truck-interface-installers.html
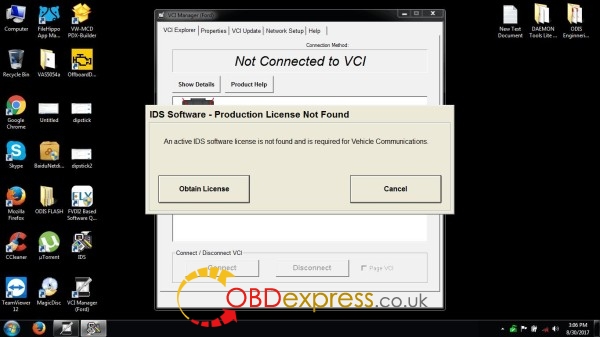
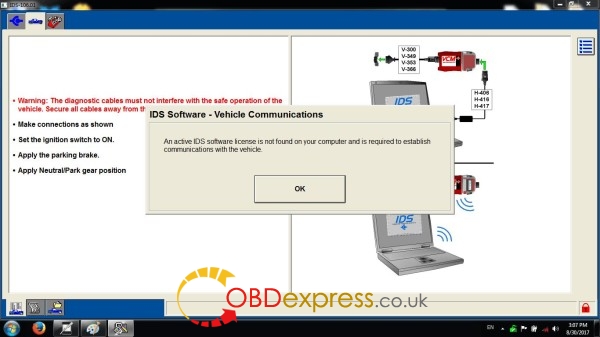
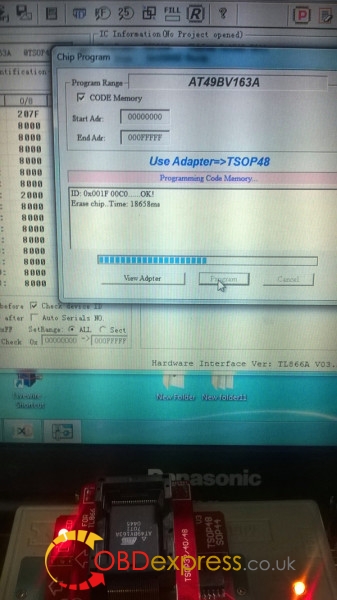
I have used it to program a new chip. Success.

nexiq-usb-link-program-a-new-chip (1) nexiq-usb-link-program-a-new-chip (2)


Source:

http://www.obdexpress.co.uk/service/genuine-vs-clone-nexiq-usb-link-2-22610.html

How to: VCM2 clone reprogram Ford PCM/ECM modules

$
0
0

VCM2 manual: Ford IDS reprogram PCM/ECM modules.


What is a reprogram engine control module?

The Engine Control Module (also called the Powertrain Control Module or PCM) is the brains of the engine management system. It controls the fuel mixture, ignition timing, variable cam timing and emissions control


What is the PCM on a Ford?

A power-train control module, abbreviated PCM, is an automotive component, a control unit, used on motor vehicles. It is generally a combined control unit, consisting of the engine control unit (ECU) and the transmission control unit (TCU).


What is flashing a ECM?

ECM ECU PCM TCM FLASH – ENGINE COMPUTER VIN PROGRAMMING FLASH & REFLASH. “Flashing” refers to reprogramming automotive engine control modules (ECMs). Almost all new vehicles today are now flash programmable. Flash reprogramming is an important part of repairs and tune-ups on most 1996 and newer cars.


What is PCM reprogramming?

To reprogram a PCM or other vehicle module, you need a factory scan tool, or an aftermarket scan tool with reprogramming capabilities, or a J-2534 compliant “PassThru” interface tool (or J-2534-1 for 2004 & newer vehicles) that can connect a PC or scan tool to the vehicle’s diagnostic connector or module.


How to do Ford module reprogramming?


When a module such as a PCM is reprogrammed, it is not removed from the vehicle. All programmingis done through the communications network.


You need Ford IDS software, original or crack

You need a HQ VCM2 clone SP177-C or SP177-C1

(VCM2 genuine definitely is the best solution, but a high-quality one should work great, not  cheap crappy tools)


Good tips you may need:


Where to buy VCM2 clone of high quality?


Where to buy VCM2 clone at the best price?


Ford IDS crack download: (TRY ON YOUR OWN RISK)

IDS 104:


To reprogram an existing module, follow these steps:


(please connect the cloned VCM2 unit to the car and run Ford IDS)


Step 1:Select the toolbox tab at the top of the screen

Step 2: Select “Module Programming”

Step 3: Select the tick mark or the Enter key

Step 4: Select “Module Reprogramming”

Step 5: From the fly out menu, select the type of module to be reprogrammed

Step 6: Select the tick mark or the Enter key

Step 7: The application will compare the current calibration level to the latest one available for thatvehicle. A message will appear.

Step 7A: If no later calibration is available, a message will appear indicating this. Select the tickmark or the Enter key to return to the Module Programming menu.

Step 7B: If a later calibration is available, a message will appear asking if you want to reprogramthe module with this calibration. If you do not want to reprogram the module, select “No”. You willbe returned to the Module Programming menu.

Step 8: If you want to reprogram the module, select “Yes” in response to the question “Do you wantto program the vehicle with this calibration?”

Step 9: Make sure that an Internet connection has been established and then select”Confirm”

Step 10: You will be presented with a screen that recommends that you carry out Self Test. If youchoose to complete this test, you will receive a list of Diagnostic Trouble Codes (DTC’s) that havebeen set on the vehicle. When finished viewing this list, select “Exit”.

Step 11: Follow the on-screen instructions to prepare the vehicle and turn the ignition key off and on.

Select the tick mark or the Enter key after each one.

Step 12: If necessary, apply the reprogramming label to the PCM

If an emissions recall has been performed or a required emissions-related TSB has been completed,an Authorized Modification label must be placed on the PCM. These labels can be purchased at theparts counter of a Ford or Lincoln/Mercury dealership.

Step 13: Select the tick mark or the Enter key to return to the Module Programming menu.


a very important note:

Ford VCM2 IDS Error Code:11.0×0 851082 when PCM reprogramming


It’s aimed to help how to reprogram/reflash Ford PCM via IDS software esp. for those with  Error Code:11.0×0 851082 will be shared here by other users.


Error message:

“The operation cannot begin because the PCM failed to complete a service procedure. Perform PMI on the PCM to resolve the issue.”


Possible scanners working with:


Customer solutions:

Customer A:

Turnoff your firewall


Customer B:

Uninstall fmp and reinstall it. I have had this happen before.

I have had some new pcm be un programmable.

And just for reference. Fmp doesn’t like Google. Use 32 bit processor as well.

I had to slow my computer down from 64-32 because fmp would not work correctly with 64.

Good luck.


Customer C:

If you are checking PCM for up-dates, Ford will advise on 6.0L powertrain if there is a reflash avail for TCM, FICM or PCM, if it states there is no update then all three modules are at latest level, no action required, I am aware it states to remove FICM relay prior to reflash FICM, this is a carryover note from when we used PDS or WDS to reflash the FICM, if you are using IDS with VMM interface its not required to remove the FICM relay, I have reflashed over 1000 of them this way over the last 7 years, as always make sure the battery stays in the sweet spot @ 13.5 volts, make sure your laptop has sufficient power, I always plug in, make sure cables to veh and laptop are safe from accidental disconnect, Good luck!


Customer D:

If you try to VCM2 genuine or clone to make reprogaming well you need IDS V98.01 or higher.

It would be good to check if during initiation programming interface output 18,5V on pin 13 in OBD connector.


VCM2 manual: NEW module programming using Ford IDS

$
0
0

VCM2 manual: NEW module programming using Ford IDS software


You need Ford IDS software, original or crack

You need a HQ VCM2 clone SP177-C or SP177-C1

(VCM2 genuine definitely is the best solution, but a high-quality one should work great, not  cheap crappy tools)


When installing a new module, the configuration data must be transferred from the old module beforeit is removed. The new module will then be programmed using this information. Use the followingsteps to download the data from the existing module and program the new module:


Step 1: Select the toolbox tab at the top of the screen

Step 2: Select "Module Programming"

Step 3: Select the tick mark or the Enter key

Step 4: Select "Programmable Module Installation"

Step 5: From the fly out menu, select the type of module to be installed

Step 6: Select the tick mark or the Enter key

Step 7: Make sure that an Internet connection has been established and then select "Confirm"

Step 8: Follow the instructions on the screen. These instructions vary depending on the type ofmodule being installed.


NOTE: Be sure to follow these instructions in the exact order that they are given. Do not remove or install any modules until instructed to do so. Failure to follow the instructions correctly may result in the configuration data received during vehicle identification to program incorrectly or not at all.


Step 8A: If Ford Module Programming was unable to retrieve the configuration data due to either

a non-functioning module or a module which was removed before the data was retrieved, the

application will request that the user obtain information from the Module Build Data (As Built)

database. Access to this database is included in the Ford Module Programming subscription. The

data can be obtained by doing the following:

  • Go to the Motorcraft website (www.motorcraft.com)
  • Go to the Technical Resources area
  • Log in using the User ID and password set up when the subscription to Ford Module

Programming was purchased

  • Select "My Subscriptions"
  • Select "Ford Module Programming"
  • Select "Module Build Data (as Built)"
  • Enter the Vehicle Identification Number (VIN) and select "Submit"
  • Write down the information that was requested by the Ford Module Programming

application

  • Return to the Ford Module Programming application and enter the requested information

Step 9: If necessary, apply the reprogramming label to the PCM

If an emissions recall has been performed or a required emissions-related TSB has been completed,

an Authorized Modification label must be placed on the PCM. These labels can be purchased at the

parts counter of a Ford or Lincoln/Mercury dealership.


NOTE: It is the responsibility of the technician to inform the customer that Ford Motor Company will not reimburse the vehicle owner for field service actions that are not completed at a Ford or Lincoln/Mercury dealership.


Step 10: When the "Programming complete" screen appears, select the tick mark or the Enterkey. If PATS initialization is required, Ford Module Programming may automatically link to the PATSparameter reset and/or key relearn procedures. Two ignition keys may be required to complete the

PATS initialization procedure.

Step 10A: If PATS initialization is required and Ford Module Programming did not link to thatfunctionality automatically, go to the Toolbox tab and select "PATS". Detailed instructionsare provided in Section 6.


Good tips you may need:


Where to buy VCM2 clone of high quality?


Where to buy VCM2 clone at the best price?


Ford IDS crack download: (TRY ON YOUR OWN RISK)

IDS 104:


How to reprogram Ford PCM with vcm2 clone:


Viewing all 43 articles
Browse latest View live